Updated: 10-Jun-24
See our new section on Zoom Tips and Tricks below.
Zoom SecurityTo prevent the possibility of uninvited participants, Zoom applies session passwords by default. This means that encrypted information is appended to the Meeting Room address. When you open the Zoom app, please check Meetings > Show Meeting Invitation for the current meeting information applicable to you. It will now look something like this:Join Zoom Meeting https://us02web.zoom.us/j/nnnnnnnnn?pwd=dlMCdyFsVUk58mR3TE1jaTFmNdwqQTZoom have also enabled Waiting Room by default. This prevents anyone from joining before you start the meeting, and also means that you may be asked to Admit attendees using the Participants menu. You may find that under the Meetings > Edit menu that Waiting Room needs to be Enabled to use this feature. You can update these and other Settings by logging in to your account on the Zoom website under Admin > Account Settings. |
 Zoom is basically it is a video-conferencing application but with the ability to show presentations, documents and videos to participants. It is best suited to classes where the tutor does a presentation, but can allow participants to interact by voice, video or text chat.
There is no cost to use the Basic Plan, but it is limited to 40-minute sessions unless you want to pay $23 per month for the Pro version. Up to 100 participants are permitted to join a Zoom meeting. It is very easy to use and participants join by clicking on an emailed link. U3A Brisbane will provide the Pro version Education licence to tutors who run regular Zoom classes.
For Tutors
With a U3A Education licence, we will provide tutors with an email identifier and password. You can schedule Zoom meetings through the Zoom app and obtain a link to email to students. Students just need to click on that link to join your meeting. The first time they join they will be asked to install or download an app, but they can also pre-install the app (see information below under Participants).
You can use any computer or device to run a meeting (Windows or Mac PC, laptop, iPad, Android tablet, phone). If you want to use video, which is the preferred method, you will need a device with a camera and microphone. For a desktop computer, this would typically involve a webcam and microphone headset. Most laptops come equipped with camera and microphone as do iPads and tablets. We do not recommend hosting Zoom meetings with a phone. It is possible, but more difficult because of the limited screen size. Students can use a phone if they wish.
Starting a meeting
If this is your first meeting, and you don't have the Zoom client installed, go to the Zoom Download Center and install the appropriate Zoom Workplace app for your PC or mobile device:
Zoom Download Center.
In advance of the meeting, send an email to your students, either privately or using the U3A Tutor login, with the time of the class/meeting and the link to your Personal Meeting Room. We generally recommend the use of Scheduled Meetings, which assign a different Meeting Id to each type of meeting. This can be set to Recurring so that the same Meeting Id is used each week. The Zoom link will look like this:
https://u3abrisbane.zoom.us/j/nnnnnnnnnnIf you haven't recorded your Personal Meeting Room link, open the Zoom app and click on Meetings in the top menu. Click on the Edit button. You may wish to change the default video and audio status at meeting startup. Click Save. Click on Show Meeting Invitation and you will see the link:
Join Zoom Meeting
https://u3abrisbane.zoom.us/j/nnnnnnnnnn where nnnnnnnnnn is the meeting id. Save that link and you can use it for all future meetings (if using Personal Meeting Id or a Recurring Scheduled Meeting).
Zoom have made session passwords the default (you can also set this manually through your login settings). This does not mean your participants need to enter a password however. A long encrypted form of the password is embedded in the link you forward, e.g.
https://u3abrisbane.zoom.us/j/nnnnnnnnnn?pwd=Nhb76hdvgtrswgg47n%d$h This prevents an unwanted interloper from joining your meeting by guessing the numeric Meeting Id.
When you are ready to start, click on the blue Start button. You can choose to host with or without video (i.e. camera) but clearly it will be more effective with video.
You can share any screen that is open on your device. To share a PowerPoint slideshow, open the slideshow in a window and go to full screen mode. Then return to the Zoom window, click Share Screen and select the PowerPoint window.
The Zoom window has a menu at the bottom that you use to manage the meeting. To close the meeting click on Leave Meeting at the right of the menu.
The first time you try Zoom, you might be best to test it with one or two participants.
Screen Sharing - Important
To prevent participants from inadvertently sharing their screen with the meeting: In the host controls, click the arrow next to Share Screen and click Advanced Sharing Options. Set it to "One participant can share at a time" and "Only Host can share". You will then need to give permission to a selected participant if you wish a class member to do a presentation. You can do this by enabling a participant to be a co-host (through Participants menu).
 Managing a Class
For a class where the tutor talks and presents slides, participants don't need to use a camera. They can choose to use audio only, but this may be a challenge to manage since anyone with a microphone can talk. The host (tutor) can turn off both video or audio (Mute) for any participant, and students can still interact via the Chat facility. Some ground rules may need to be established, depending on the size of the class and the nature of the presentation.
Broadband Requirements
Anyone using a camera will require reasonable upstream bandwidth. Any NBN plan of 25Mbps or above will meet the requirement. If you have ADSL or a 4G connection, the camera video signal may stutter. Participants operating passively, i.e. viewing the content without using a camera, should be fine with any broadband connection.
Resources
Zoom Help Centre
Managing Participants
Keep Uninvited Guests out of your Zoom Event
There are many Zoom tutorials available, but it is so easy to use that you may not need them.
For Participants
See Attending Online Classes page.
U3A Support
Initially, you could use Google to search for more information. The U3A IT team can answer questions at:
If you have any tips or suggestions for additional information to add to this page, you are welcome to send to the help address.
Zoom Tips and Tricks
Images here are as they appear on a desktop or laptop. They may vary slightly on an iPad or tablet.
Basic Settings
 Open the Zoom application, select Meetings at the top menu, then Edit.
Password It is strongly recommended that a password be set, in order to prevent the possibility of an uninvited guest entering your meeting by 'guessing' the meeting Id. Participants do not need to enter the password since it is encrypted as part of the meeting invitation.
Audio Set to Computer Audio unless you want particpants to join via a phone call (not useful for most classes).
Advanced Options Select the options you require. Mute participants upon entrty is particularly useful for large groups. You can Un-mute individuals to allow them to speak. Enable Waiting Room is useful. It ensure that no one joins the meeting until you are ready. However, you will have to admit each user individually so it may be tedious for large groups.
Do NOT select Only authenticated users can join. This requires every participant to have a Zoom account. Others will receive an error message Internal Meeting Only. In general, only the meeting host requires a Zoom account.
Save If you have changed any settings, select Save to set them for subsequent meetings.
Spotlighting
The Spotlight feature enables the Zoom host to spotlight one of the participants, e.g. the tutor, to be fixed as the main large image, instead of jumping to the current speaker. To do this, hover over the image of a participant and right-click (on a PC/laptop that is. On iPad it may be in Participants menu) and you will see a menu including Spotlight. That makes the selected speaker the primary for everybody in the session until changed. Only the host can do this. More info: Spotlight Video.
There is s similar feature called Pin Video that an individual participant can use. However, it only applies to what they see, not everybody else.
Sharing Videos on Zoom
Online videos (e.g. YouTube), or locally stored videos, can be easily shared on Zoom using the Share Screen facility.
Firstly, open the video on your computer and pause it. This is best done before the meeting starts. Then select Share Screen on the in-meeting menu (at bottom of screen).
At the bottom of the initial Share window (where you select the window you want to share), you will see the following:
 You should tick both boxes when you want to share a video clip. If you don't tick this first, Zoom will be trying to pick up sound from the video through your microphone, rather than directly from the computer.
Zoom Share Settings
As host, you can prevent participants sharing by clicking on the up arrow next to the Share Screen icon, then Advanced Options. This allows you to set an option to prevent participants from sharing.
You can also set this using the window that opens when you start Zoom. Select Home at the top, then the Settings cogwheel at upper right. Go to More Settings at bottom and it will open a web page where you can apply various permanent settings. Look for Screen Sharing:
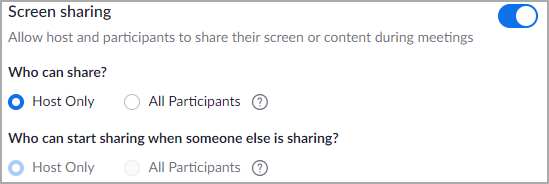 During a meeting, you can change Share Settings using the Security icon in the main Zoom window. The options include:
Breakout Rooms
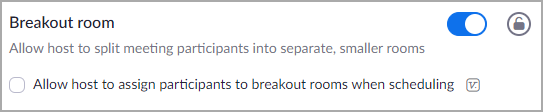
The Breakout Rooms feature enables you to segment your class into different rooms, e.g. to discuss a particular issue and report back. You need to enable it in your main Settings in the Zoom application (or by logging in to the Zoom website). In the Zoom application, select Home at the top, then the Settings cogwheel at upper right. Go to More Settings at bottom and it will open a web page where you can apply various permanent settings. Go to Admin > Account Management > Account Settings > Breakout Room and set the option:
 A Breakout Rooms icon then appears in your Zoom menu in a meeting, e.g.
If you select the Breakout Rooms option during a meeting you will be offered options on how to automatically or manually split the room, and to set a time limit for the breakout session. The host is generally not included in the breakout rooms, so you may find yourself alone for a while. You can terminate the breakout rooms manually at any time, and all participants will then return to the main room.
More info: Managing Breakout Rooms
Polls
Polls allow you to ask class members to vote on particular questions. If you don't already have the Polls option in the Zoom app, you need to enable Polling in your main Settings in the Zoom application (or by logging in to the Zoom website). In the Zoom application, select Home at the top, then the Settings cogwheel at upper right. Go to More Settings at bottom and it will open a web page where you can apply various permanent settings. Go to Admin > Account Management > Account Settings > Polls and set the option:
 The Polls icon appears in your Zoom menu in a meeting. If you select this option during a meeting you will be asked to enter one or more questions for participants to answer, with possible responses. As participants answer, you will see the results accumulate in summary form. However, it is better to pre-set the poll questions prior to the meeting by logging in to the Zoom portal u3abrisbane.zoom.us. Select Meetings from the menu at left, then select the particular meeting where you wish to run the poll. Scroll down the Meeting page and you will see the Polls section with an option to Create a new poll.
More info: Polling for Meetings
Closed Captions
Zoom provides a Live Transcript (Closed Caption) facility which participants can activate if desired. To turn on captions, look for the CC icon within the meeting controls (at bottom of Zoom window if using a desktop PC). If captions are OFF, the icon will look like this:
 Click the icon to enable captions. When captions are enabled, the icon will change to this:
 You can turn off captions by clicking on the icon again. If you don't see the CC icon, it means that the meeting host has not enabled captions.